Vercel offers free hosting with quite generous possibilities, at least at the time of writing this in May 2025. It is a serverless configuration, which mean we do not start Express server normally but there is a way to overcome this limitation and in this guiide we will see how to deploy a full-stack web application with Express server and React (Vite) in the frontend.
- Create an account at Vercel with GitHub and authorize Vercel to see your private repo(s).
We can deply a full-stack app in 2 ways:
- as 2 separate apps (server and client)
- as one app from teh monorepo
Let's see the second option as if you are working as a solo developer on the app you are doing both, a server and a client, anyway.
Organizing the files and folders
| For this guide we will assume that your server's main file is called index.js.
For this approach to work we need to have the following structure of the app where in the root of your project is the client and the server is inside root/api:
root
/api (in this folder you have your entire server with all the related files, for example:)
    /models
    /controllers
    /routes
    /node_modules
    index.js
    package.json
index.html
package.json
/public
/src
vite.config.js
In root/vite.config.js we need to make sure to set the base url for the frontend and the output production folder. Also we can clean the dist folder everytime we rebuild to make sure there are no artefacts left from the previous builds:
import { defineConfig } from 'vite';
import react from '@vitejs/plugin-react';

export default defineConfig({
  plugins: [react()],
  base: "/",
  build: {
    outDir: "dist",
    emptyOutDir: true  // Clean the dist folder before building
  }
});
In the root/ create a file vercel.json where we will provide the following config:
{
  "rewrites": [
    {
      "source": "/api/(.*)",
      "destination": "/api/index.vercel.js"
    },
    {
      "source": "/(.*)",
      "destination": "/"
    }
  ]
}
This will make sure that the reuqest to server's api go where they hav to and the frontend routes will be treated accordingly.
Now for this to work we need to check if the routing system in the server is setup properly. so all the backend routes start with /api prefix.
You can add it as the first part for all route in your main server's file (ie, index.js):
app.use("/api", require("./routes/routes.js"));
In root/package.json make the scripts section to be like so which will allow us to test the production build before uploading to Vercel:
  "scripts": {
    "dev": "vite",
    "build": "vite build",
    "lint": "eslint .",
    "preview": "vite preview",
    "start": "nodemon ./api/index.js"
  }
This will allow to start a server from teh root with npm run start and client with npm run dev in development. And if you'd want to test the production build from teh zdistz folder you can build it with npm run build, start the server with npm run start and open localhost:SERVER_PORT_NUMBER in your browser.
Config for the client to see correct URL of the backend
If you do not have it yet, add a config.js file in your fronend src/ folder to dynamically choose to which server connect, either the loca one while developing or the deployed on in production:
export const URL = window.location.href.includes('localhost')
  ? 'http://localhost:4444'
  : 'https://wallpapers-by-alex.vercel.app';
The deployed URL is the one you will get from Vercel.
To use this URL in your code where needed to send a request to a server first import it:
import {URL} from "../config";
And the add to the request's URL like so:
      const response = await axios.post(`${URL}/api/create-checkout-session`, dataToSend, {
        headers: {
                    "Content-Type": "application/json",
                 }
  });
| Another way could be to add /api prefix for all the backend request right into config:
export const URL = window.location.href.includes('localhost')
  ? 'http://localhost:4444'
  : 'https://wallpapers-by-alex.vercel.app/api';
Then in frontend's request you ca just use:
      const response = await axios.post(`${URL}/create-checkout-session`, dataToSend, {
        headers: {
                    "Content-Type": "application/json",
                 }
  });
without ading api before route name as /create-checkout-session in this example.
Server's setup
To prepare your Express server to run in Vercel's serverless environment inside your api/ folder create a new file called index.vercel.js.
We will import the server's main file (ie index.js) and and export a serverless function handler:
// Import your server main file
const app = require('./index');

// Export a serverless function handler
module.exports = (req, res) => {
  return app(req, res);
};
The index.js, the main server file, should be modified in a way that it doesnt start in porduction environment, but rather is only exported.
For example:
// Main server file, ie index.js
// Imports and initializations
const express = require("express");
const app = express();
require("dotenv").config();
const cors = require("cors");

// Cors setup to allow requests in production from the client
app.use(cors({
  origin: "*",
  methods: ["GET", "POST", "PUT", "DELETE", "OPTIONS"],
  allowedHeaders: ["Content-Type", "Authorization", "Accept", "X-Requested-With"],
  preflightContinue: false,
  optionsSuccessStatus: 204
}));

// Enabling requests body handling by Express
app.use(express.urlencoded({ extended: true }));
app.use(express.json());

// Importing routes and using api prefix for them
app.use("/api", require("./routes/routes.js"));

// Export the Express API to be available for the serverless function handler
module.exports = app;


// And for development only start the server if we're not in a serverless environment
// This will only happen locally in development mode
if (process.env.NODE_ENV !== 'production') {

  // Serve static files from the dist directory
  app.use(express.static("dist"));
  // Serve index.html for all other requests
  app.get("/{*splat}", (req, res) => {
    res.sendFile(__dirname + "/dist/index.html");
  });
  // Start the server
  const port = process.env.PORT || 4444;
  app.listen(port, () => console.log("🚀 Listening on port: " + port + " 🚀"));
}
In root/api/package.json check the scripts to tell Vercel that there is no build commands for the server:
  "scripts": {
    "test": "echo \"Error: no test specified\" && exit 1",
    "start": "node index.js",
    "build": "echo 'No build step required'",
    "vercel-build": "echo 'No build step required'"
  },
The rest of the app stays all teh same.
Deploying to Vercel
Commit all the changes and push to GitHub.
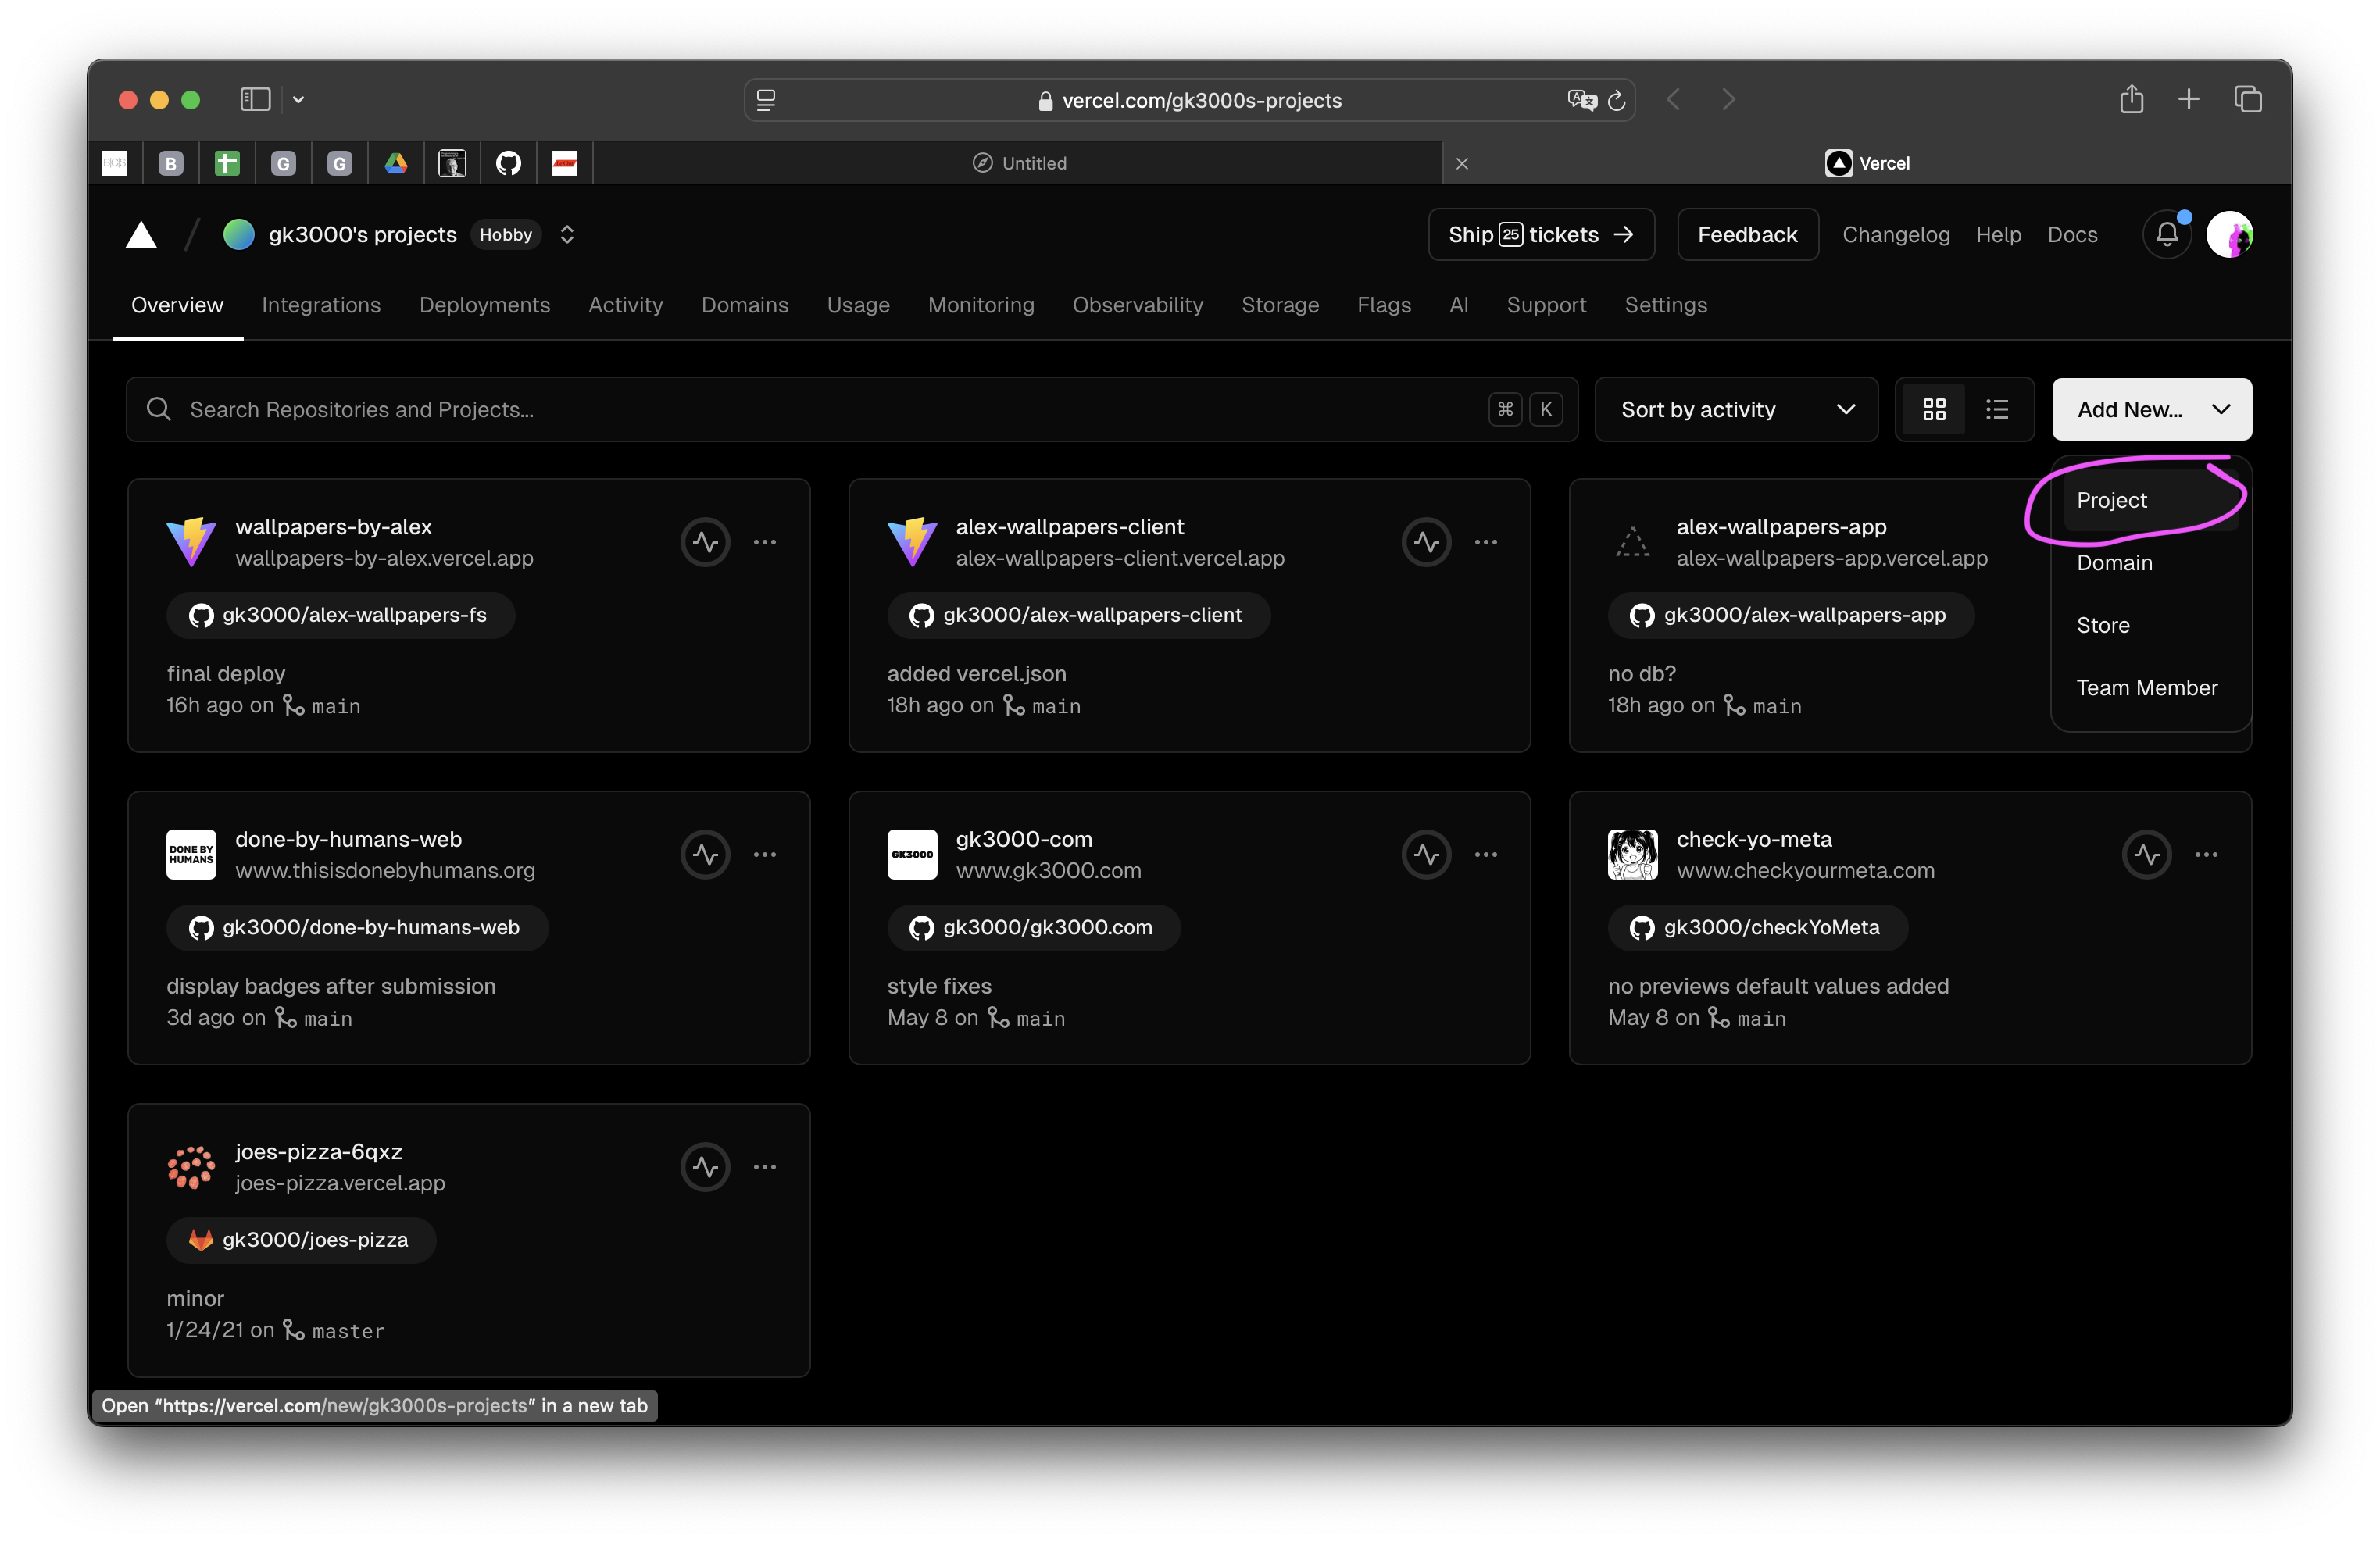
Log in to Vercel dahsboard, press "Add new" dropdown button and select "Project".
In "Import Git Repository" choose the repo with your project and import it.
Give it a name.
In "Framework Preset" choose "Vite"
In "Root Directly" keep it ./
Expand "Build and Output Settings".
We need to change "Install command" to install npm packages for both clietn and server:
npm i && cd api && npm i
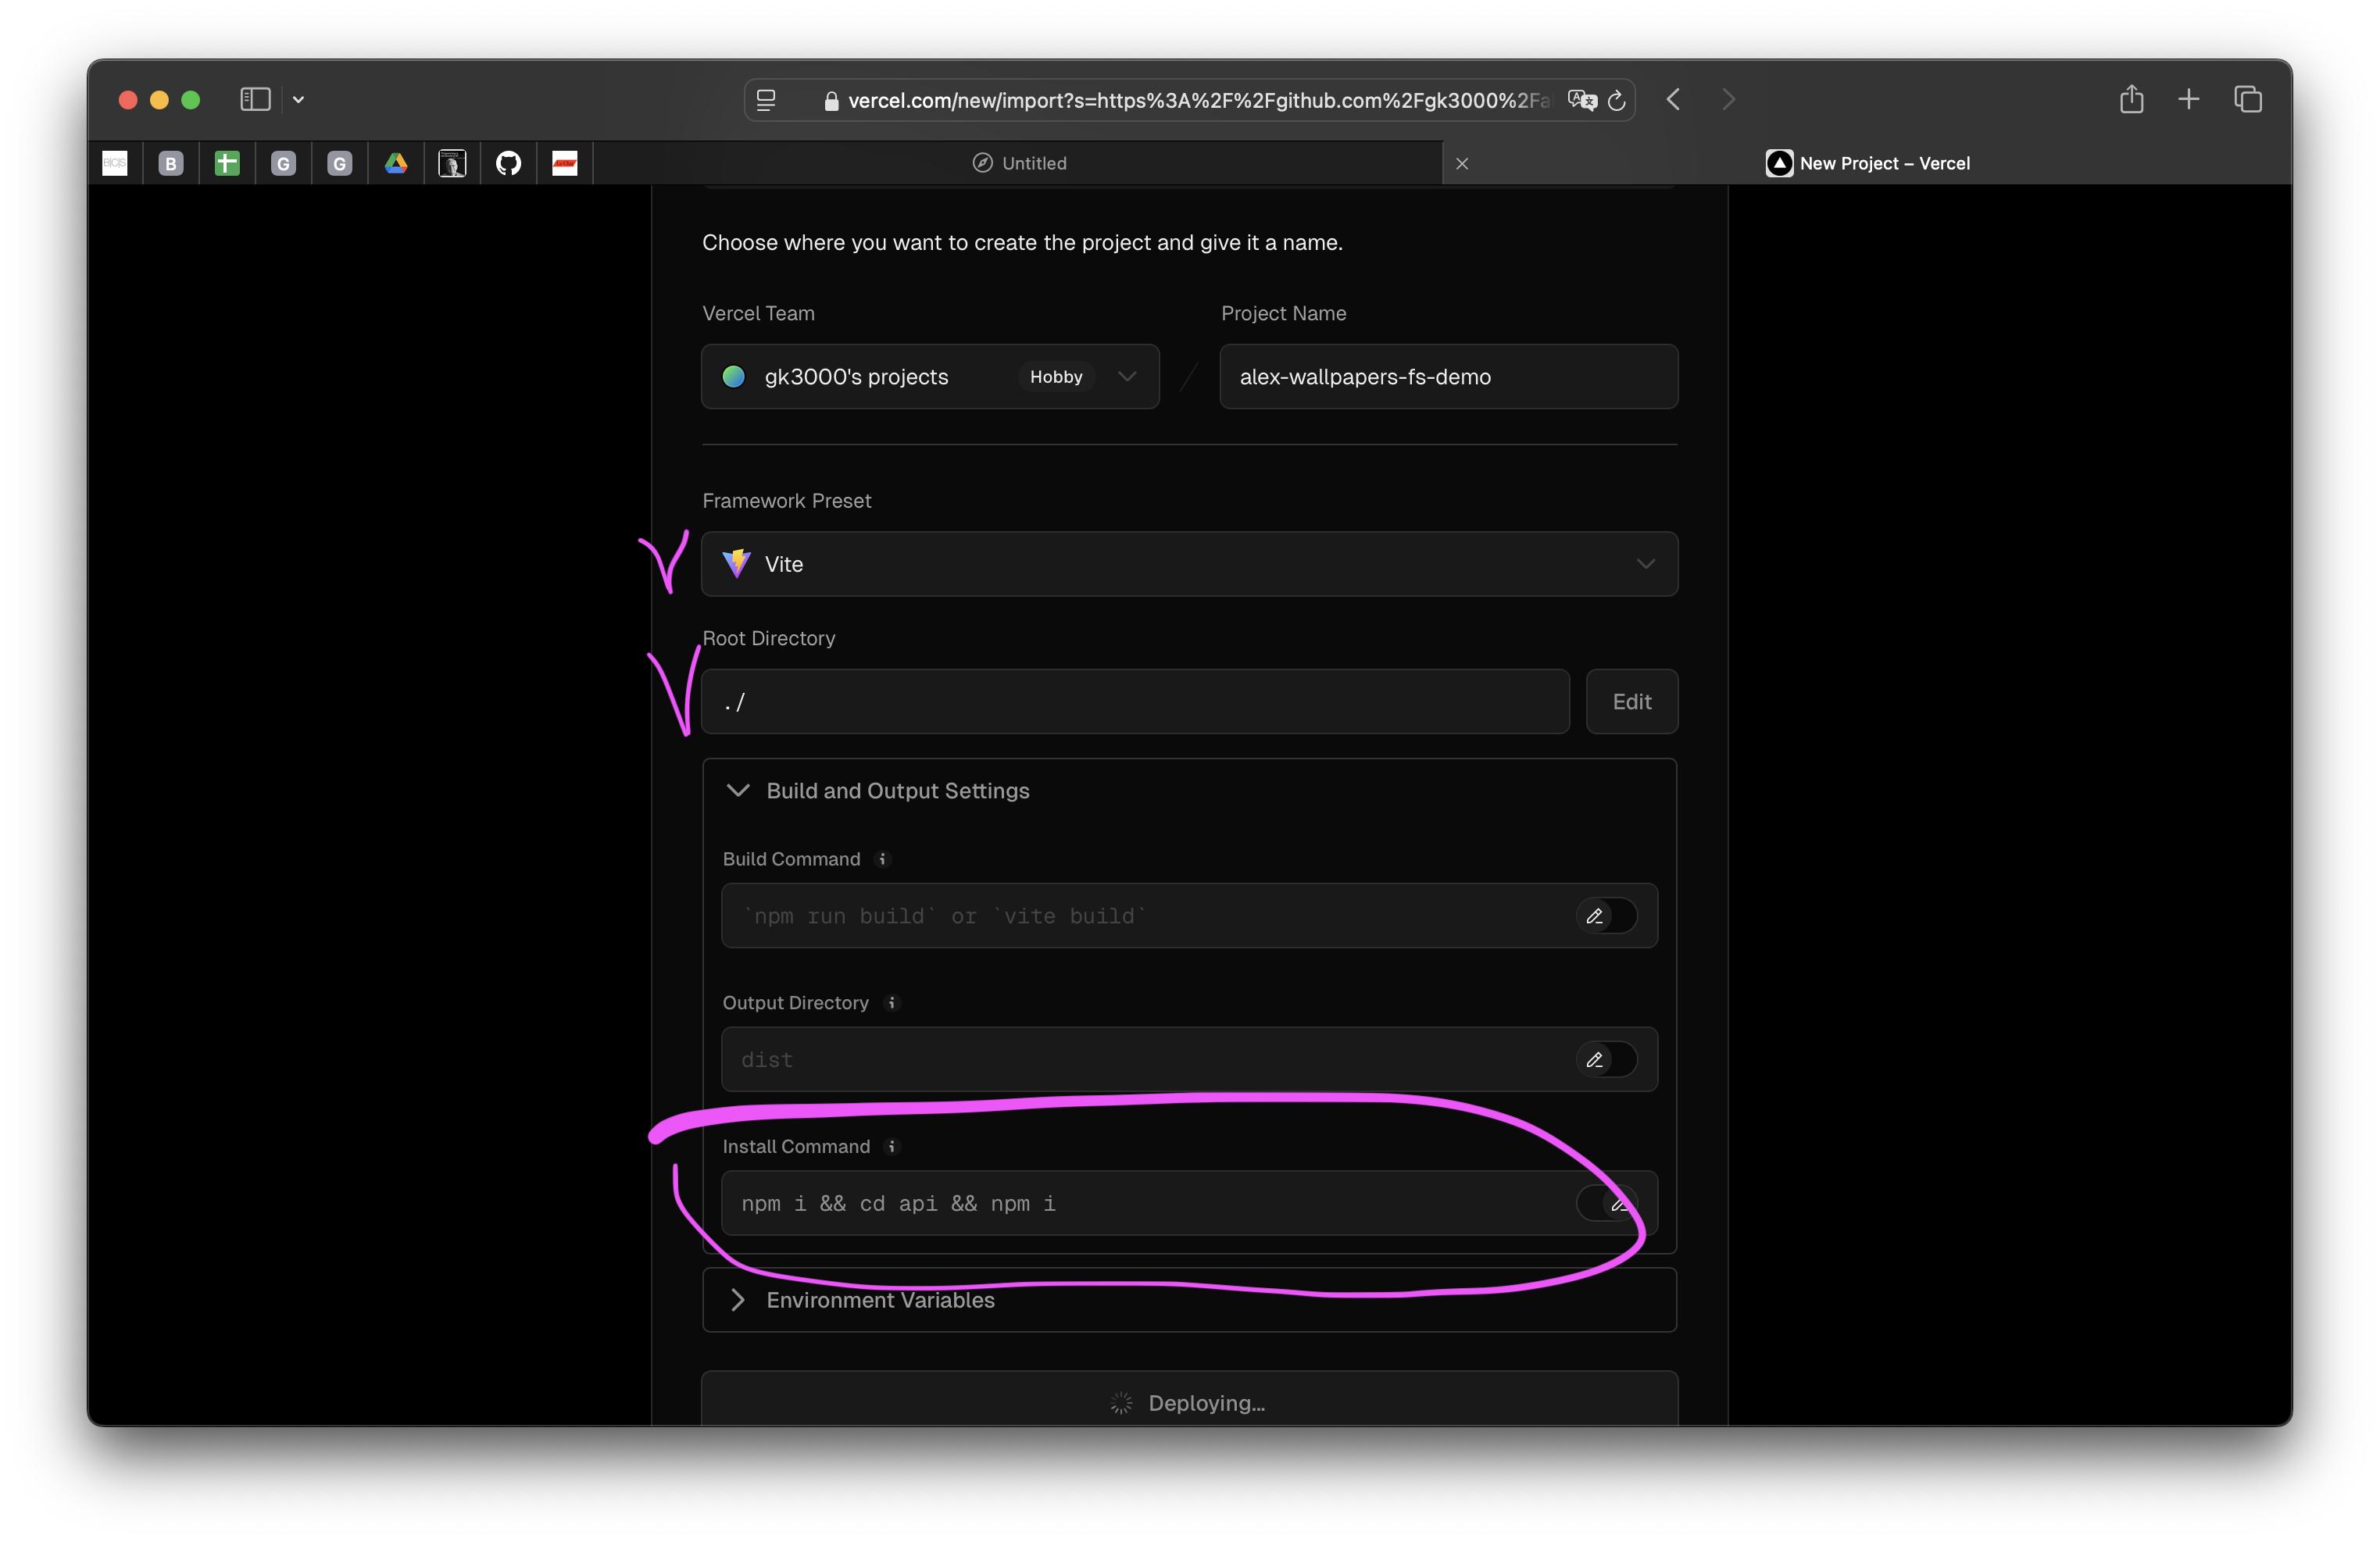
Press "Deploy" button.
After deployment process finished get back to the dashboard and check the URL of deployemnt, your website should be visible now. Copy the URL and update your root/src/config.js for your client to reach the server at the current production URL, such as 'https://your-new-website-address.vercel.app'.

Commit the changes and push to GitHub. Vercel will automatically re-deploy your project and you client will be able to communicate with your server properly.
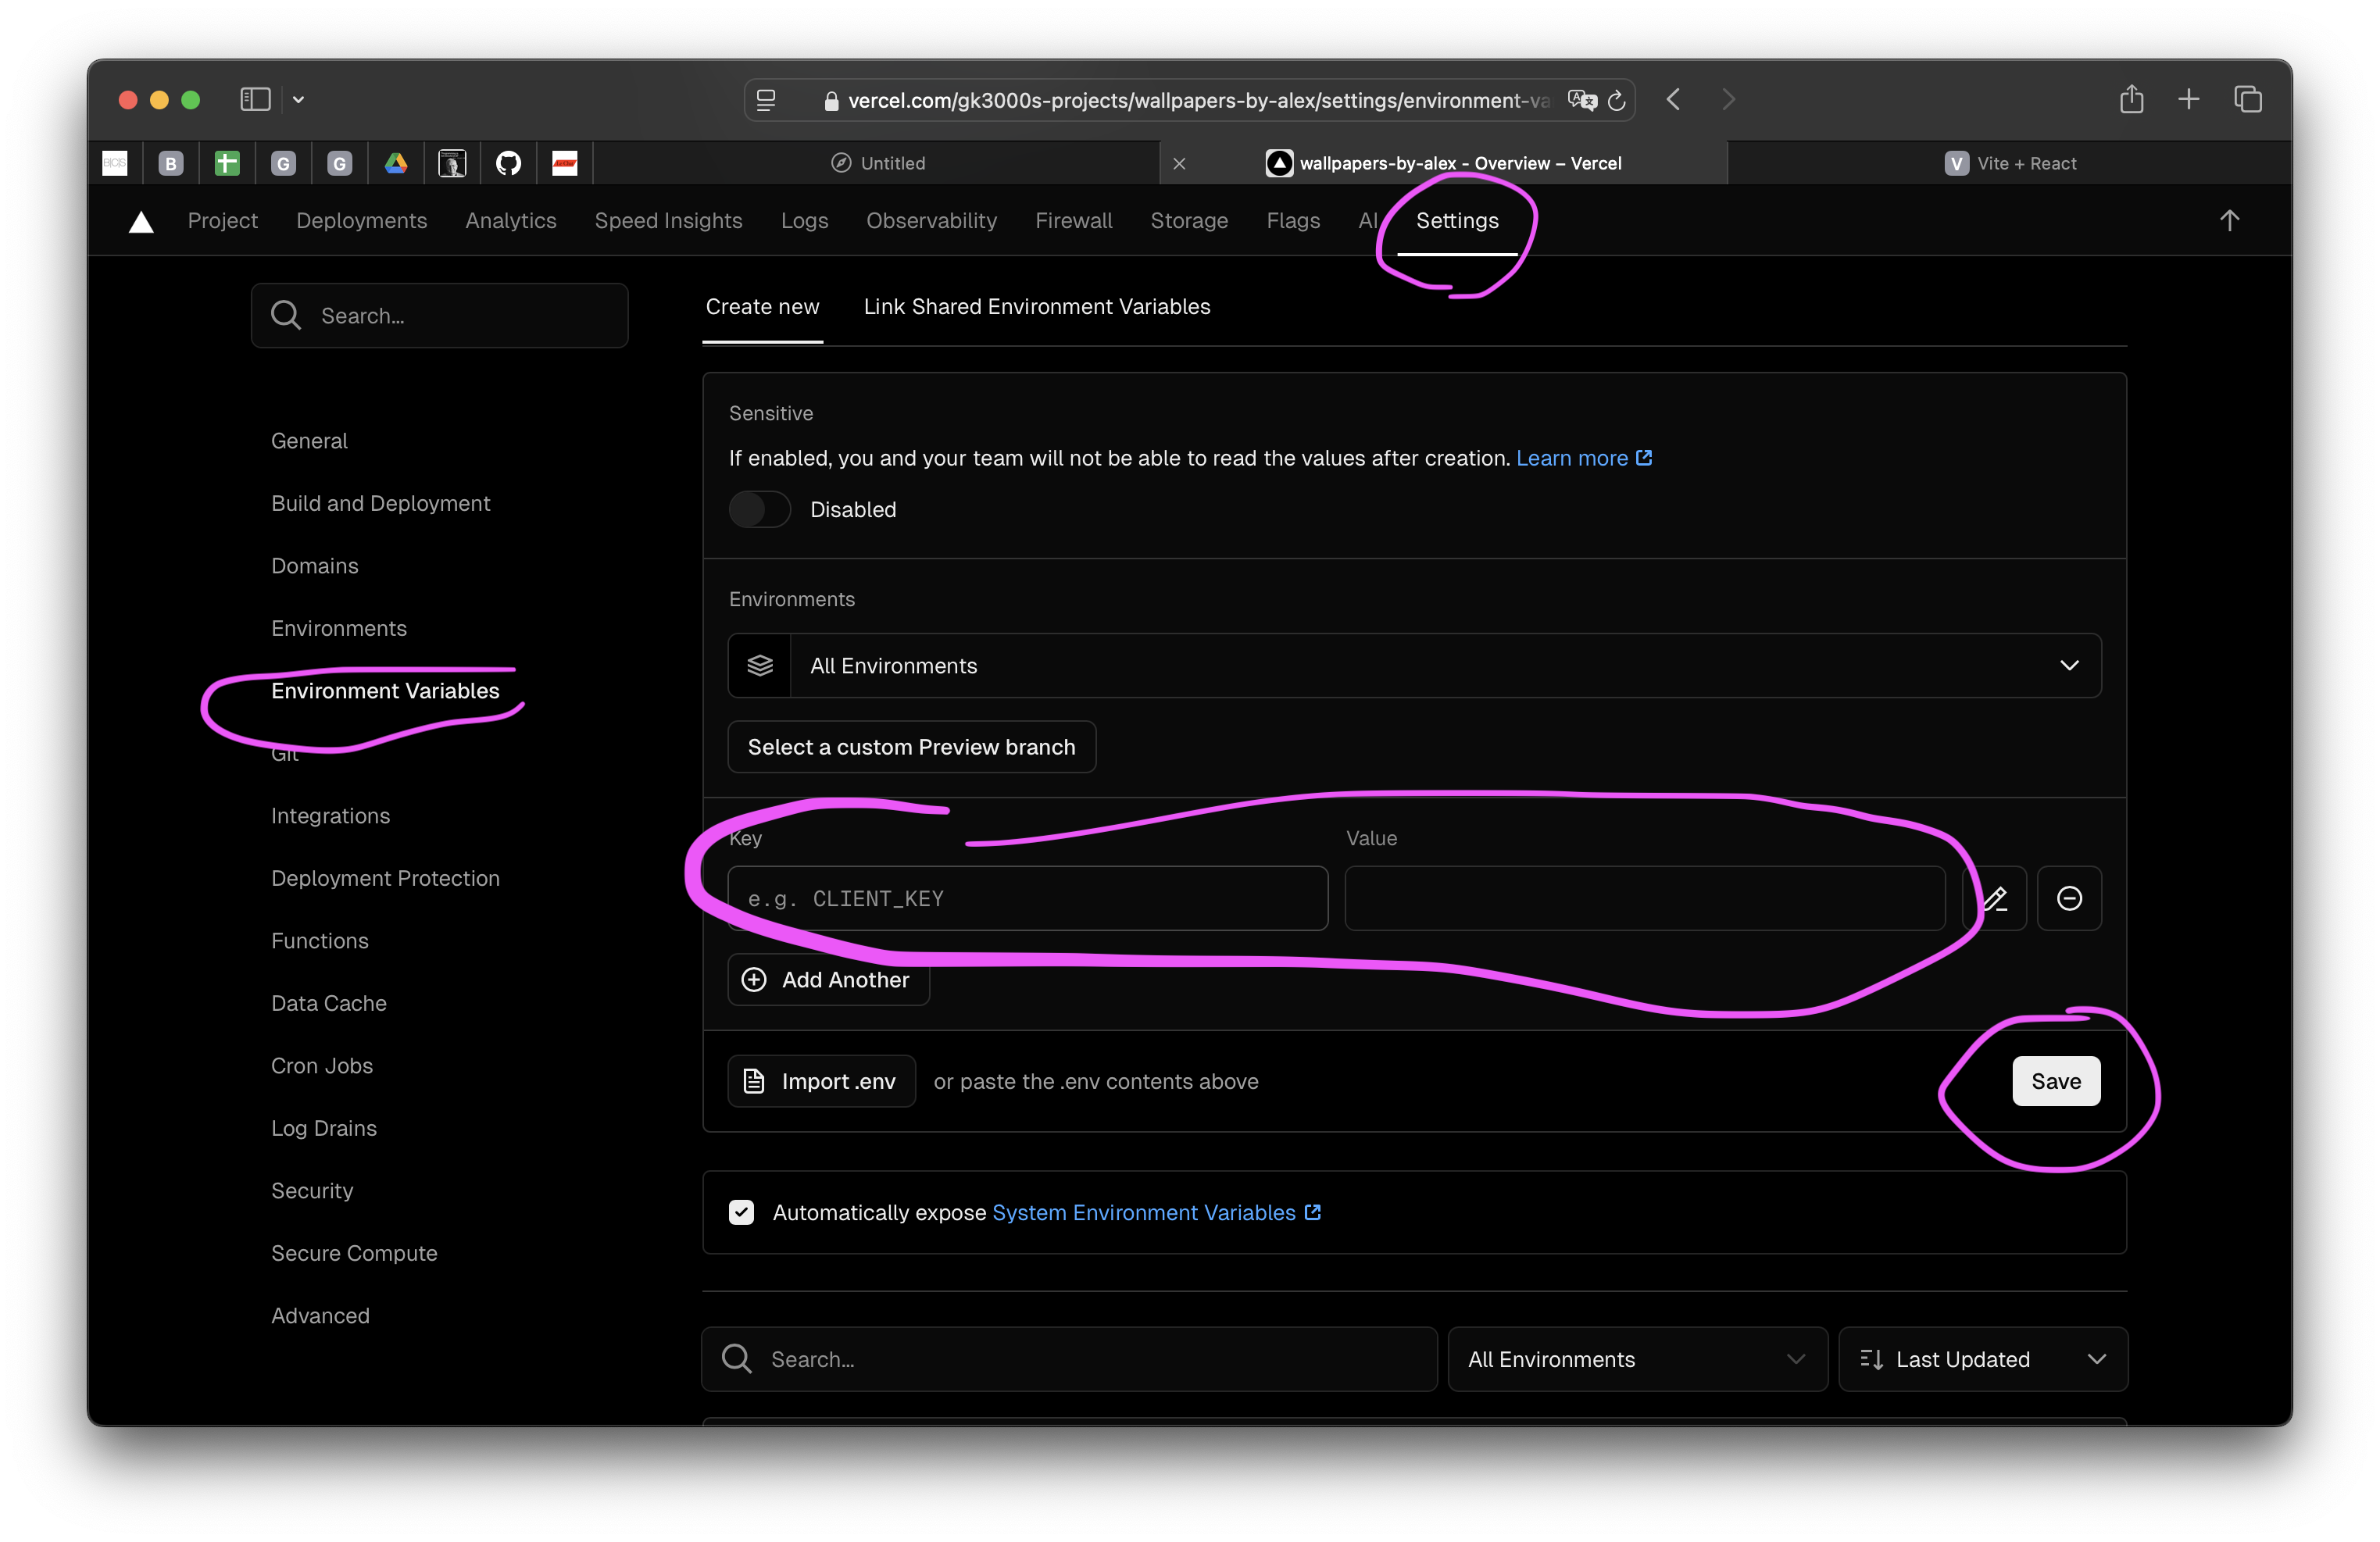
Environment variables
In the project "Settings" on Vercel there is a section "Environment variables" where you need to put all the variables you have in .env file (if any). Things like your DB connection string, any API keys and so on...
Running the app locally in development with this setup
To start the development version of your app locally with this setup from the root folder of your project start the frontend with npm run dev.
From the /api folder start the server with nodemon index.js.
Success! Right?
And here is a repo with an example of a project setup to give you an idea.